Saturday, June 29, 2013
My New Favorite Summer Salad - Vietnamese Beef Salad
I stumbled across this recipe while going through a cooking slump - desperately needing some new ideas and inspiration. The first time I made it, I was blown away by the flavors! Now, with only slight modifications, it has become a regular for dinner. It is so quick and simple to make that it doesn't seem right for it to taste this good!
I think that it would be a fantastic recipe for one person, or as leftovers - although there are never any leftovers from it around here... If you're cooking for one, I would go ahead and make the whole thing, but keep the individual ingredients separate until ready to fix it. So far we have always eaten it with the beef hot, but I'm thinking that it would be just as phenomenal cold.
Here it is, then: my version of Skinnytaste.com's Vietnamese Shaking Beef. I hope that you enjoy it as much as we have!
Vietnamese Beef Salad
1 - 1 1/2 lbs beef sirloin, trimmed of fat and cut into largish bite-sized chunks
5 cloves minced garlic (use fresh, its worth the effort!)
1 T sugar
1 T oyster sauce
1 T fish sauce
1 t sesame oil
1 t low-sodium soy sauce
1/2 c red onion, thinly sliced
1/2 c rice vinegar, divided (sushi vinegar works well, too)
1 1/2 T sugar, divided
1 1/2 t kosher salt, divided
1 T lime juice
1/2 t fresh ground pepper
8 oz assorted fresh greens (I used spinach and baby mixed greens)
1 tomato, thinly sliced (or a handful of grape tomatoes, halved)
1. In a bowl or bag that will hold all of your meat, combine the garlic, sugar, oyster sauce, fish sauce, sesame oil and soy sauce. Stir well. Add the meat, stir or shake to coat well. Marinate at least several hours, or overnight.
2. An hour or so before eating, in a small bowl or bag combine the red onion, 1/4 c rice vinegar, 3/4 T sugar, and 3/4 t kosher salt. Mix well. Let this sit in the fridge until ready to assemble the salad. Please, DON'T SKIP THIS STEP! If you think you don't like red onion, try this anyway. Trust me. Just do it. (I didn't give my onions quite enough time to pickle when I made this for the picture. Ideally, they will be almost translucent and the pickling liquid will be pinkish-purple.)
3. In a small dish or cruet, combine the remaining 1/4 c of rice vinegar, 3/4 T sugar, 3/4 t kosher salt, plus the lime juice and fresh ground pepper. Set aside.
4. Heat a heavy skillet on medium-high. I use a cast-iron skillet, so I don't add any oil, but you might need to add a touch of extra-virgin olive oil, depending on your pan. Add the meat and all of the marinade. Cook, stirring occasionally, until the beef is browned and cooked to your desired "doneness".
5. Meanwhile, assemble the salad greens on plates. Add the sliced tomatoes and pickled red onion. Drizzle the dressing over the salad. Top the salad with the beef, when it is finished.
Sunday, January 13, 2013
Springtime on Easy Street - Progress Update
Well, despite my best intentions, I'm still running "behind"... I did get quite a bit done between Christmas and New Year's - I finished all of my flying geese, all of my shaded 4 patches, and all of my "square geese". I have quite a stack of pieces now! My husband thinks the colors are "wild", but I'm really enjoying seeing how everything is coming along, and how the various fabrics are playing with each other.
I have not been able to sew at all since just after New Years, as I have pulled a muscle or two in my back. I have spent a lot of time sitting in the recliner knitting, but sitting over a sewing machine has not been an option.
Here, though, is a mock-up of the two types of blocks going into the quilt (I haven't made the neutral brick blocks yet, and my geese are not sewn into blocks):
I'm very pleased with them! I think the whole quilt is going to be amazing, and it has been so much fun working with Mom on our quilts. I'm going to miss the Friday morning phone calls of "have you seen the latest clue?" and "so how many strips/units do you think we'll need"!
My goal is to finish piecing the top by my birthday in early February. It's an optimistic goal, since I start back to school this week (Anatomy & Physiology 2 and Microbiology) but I think if I'm dedicated, I'll be able to do it.
A huge thank you to Bonnie, for this wonderful quilt, and a another huge thanks to Mom, for braving it out with me!
I have not been able to sew at all since just after New Years, as I have pulled a muscle or two in my back. I have spent a lot of time sitting in the recliner knitting, but sitting over a sewing machine has not been an option.
Here, though, is a mock-up of the two types of blocks going into the quilt (I haven't made the neutral brick blocks yet, and my geese are not sewn into blocks):
I'm very pleased with them! I think the whole quilt is going to be amazing, and it has been so much fun working with Mom on our quilts. I'm going to miss the Friday morning phone calls of "have you seen the latest clue?" and "so how many strips/units do you think we'll need"!
My goal is to finish piecing the top by my birthday in early February. It's an optimistic goal, since I start back to school this week (Anatomy & Physiology 2 and Microbiology) but I think if I'm dedicated, I'll be able to do it.
A huge thank you to Bonnie, for this wonderful quilt, and a another huge thanks to Mom, for braving it out with me!
Saturday, January 12, 2013
A Sophisticate on Easy Street - Part 6
Here we are already -- the final steps completed, the finished quilt revealed. Was anyone else surprised at how complex-looking Easy Street is? I was expecting a much simpler arrangement of the pieces. Instead we get an intricate and fascinating design. I'm pleased; I hope everyone else it, too. I'm so glad Betsy kept pushing me to do this with her.
I'll admit I made some mistakes, especially mis-cutting fabrics, along the way, and they caused me to run short of some colors. Then when I saw the final layout I realized I'd want to control the arrangement of my blue fabrics, since I had so few of them, rather than try to make them appear random, so I've done a little tweaking of fabric layout. But those choices that a quilter makes as they go along are part of the fun, aren't they?
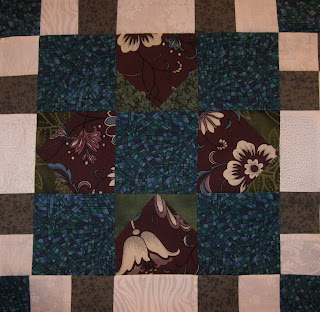
It's been too long since math in school; I don't remember how to calculate how many wrong ways there are to piece 25 squares into one block. But I assure you I almost found out the first time I tried to put Block A together! I had it all laid out next to my machine, carefully picked up and matched two squares, then stitched them one after another. Then I clipped them, put them back in their place, and began again, sewing the rows together. Should have been pretty fool proof, right? Well, I think the problem was I didn't have a firm picture in my head of how the block worked. I got the rows pieced without too much trouble, but then I tried to put the first row together. First I stitched the wrong ends of the row. After I took that long seam out, I joined the other seam, only to discover I'd turned one piece the wrong direction. All in all I sewed that seam four times before I had it right.
The rest of the seams weren't a lot better. It took me 2 and 1/2 hours to sew one block! That was enough for that day, I took a break and did some knitting. Struggling so much with one block left me feeling a little stupid, but turning the heel on a sock always seems like magic and I felt quite clever again. :)
After the first block fiasco I rethought my strategy. It seemed to me I'd do better joining the inner nine squares first, then attaching the strips on the sides, finishing with the top and bottom rows. It's easier for me to visualize and I made fewer mistakes, so I've been doing it that way since. I'm now down to about 30 minutes of sewing per block, if I'm really focused and accurate. Some of them still take up to 2 hours, though. I've also been laying out several of one block ahead of time on anything big and sturdy enough to hold them, so I don't have to stop sewing to figure out the layout each time I'm ready for a new square.
Once I had my squares up on the design wall in my sewing room I realized there were some mistakes, so I spent part of one evening taking out and resewing seams.
I may leave one of my incorrect blocks as is though, in honor of the tradition of deliberately including an error, to show you know you're not perfect, like God. To tell the truth I've never felt even close to perfect, and I'm pretty sure God's never worried that I'm approaching His record too closely, either. But I'll have to take out a lot of seams to fix that particular mistake, and I'm not sure it's worth it.
I love the way my fabrics are looking together. Spreading them out on the sofa so I can admire them keeps me motivated to sew more. My goal is to make one a day. Some days I get on a roll and make more, but as long as I do one I'll be finished in less than a month - which I think is pretty good for such a big, complicated, top. This is by far the most complex large quilt I've ever made. It's one thing to know intellectually that any design can be broken into small pieces and finished step by step. It's another thing to actually do it that way. I feel somehow empowered to take on more complex projects, thanks to Bonnie and this mystery quilt.
I've learned some things about myself while making Easy Street. I've learned that I don't really enjoy some of the faster quilting methods that others use. I don't like cutting out dozens of strips of one fabric, making perhaps hundreds of one shape and then another, efficient though it may be. I seem to have trouble staying focused and after a while I make sloppy, silly mistakes. What I do enjoy is cutting a few pieces, assembling them and then checking their accuracy before cutting and sewing more. I make fewer mistakes and I like visualizing the process and knowing that every piece is correct. Since I don't have the pressure of needing to finish a quilt quickly, I've decided that next time I won't let myself feel rushed by those early finishers, but will try to take the time I need to make sure I'm being more accurate and really having fun with it. I did, however, appreciate the freedom from "over planning" a quilt. Every fabric doesn't have to be perfect, carefully selected and visualized, to have lovely results. And sharing the process with Betsy, and so many others, made it very special. All in all it was a great experience. I think it's too bad we have to wait an entire year to do it again, don't you?
I'll be machine quilting my finished top -- another first for me, as I've only machine quilted a few small things before. But I can't afford to pay someone to finish this, and Betsy has one of her own to do, so this will be an opportunity for me to learn something new. Feel free to come back to this blog for more looks at the final product. Just click on the Easy Street tab above.
Look at over 200 fascinating versions of this Mystery Quilt here : Easy Street's Final Link-Up
I'll admit I made some mistakes, especially mis-cutting fabrics, along the way, and they caused me to run short of some colors. Then when I saw the final layout I realized I'd want to control the arrangement of my blue fabrics, since I had so few of them, rather than try to make them appear random, so I've done a little tweaking of fabric layout. But those choices that a quilter makes as they go along are part of the fun, aren't they?
![]() |
| I'm using one blue for all the Block B squares. |
It's been too long since math in school; I don't remember how to calculate how many wrong ways there are to piece 25 squares into one block. But I assure you I almost found out the first time I tried to put Block A together! I had it all laid out next to my machine, carefully picked up and matched two squares, then stitched them one after another. Then I clipped them, put them back in their place, and began again, sewing the rows together. Should have been pretty fool proof, right? Well, I think the problem was I didn't have a firm picture in my head of how the block worked. I got the rows pieced without too much trouble, but then I tried to put the first row together. First I stitched the wrong ends of the row. After I took that long seam out, I joined the other seam, only to discover I'd turned one piece the wrong direction. All in all I sewed that seam four times before I had it right.
![]() |
| My first block. |
After the first block fiasco I rethought my strategy. It seemed to me I'd do better joining the inner nine squares first, then attaching the strips on the sides, finishing with the top and bottom rows. It's easier for me to visualize and I made fewer mistakes, so I've been doing it that way since. I'm now down to about 30 minutes of sewing per block, if I'm really focused and accurate. Some of them still take up to 2 hours, though. I've also been laying out several of one block ahead of time on anything big and sturdy enough to hold them, so I don't have to stop sewing to figure out the layout each time I'm ready for a new square.
Once I had my squares up on the design wall in my sewing room I realized there were some mistakes, so I spent part of one evening taking out and resewing seams.
I may leave one of my incorrect blocks as is though, in honor of the tradition of deliberately including an error, to show you know you're not perfect, like God. To tell the truth I've never felt even close to perfect, and I'm pretty sure God's never worried that I'm approaching His record too closely, either. But I'll have to take out a lot of seams to fix that particular mistake, and I'm not sure it's worth it.
![]() |
| Proof that I'm not perfect. |
I love the way my fabrics are looking together. Spreading them out on the sofa so I can admire them keeps me motivated to sew more. My goal is to make one a day. Some days I get on a roll and make more, but as long as I do one I'll be finished in less than a month - which I think is pretty good for such a big, complicated, top. This is by far the most complex large quilt I've ever made. It's one thing to know intellectually that any design can be broken into small pieces and finished step by step. It's another thing to actually do it that way. I feel somehow empowered to take on more complex projects, thanks to Bonnie and this mystery quilt.
![]() |
| Easy Street on my Design wall as of Jan. 13. I can't seem to get the greens to show up in the photo, but they do in person. |
I've learned some things about myself while making Easy Street. I've learned that I don't really enjoy some of the faster quilting methods that others use. I don't like cutting out dozens of strips of one fabric, making perhaps hundreds of one shape and then another, efficient though it may be. I seem to have trouble staying focused and after a while I make sloppy, silly mistakes. What I do enjoy is cutting a few pieces, assembling them and then checking their accuracy before cutting and sewing more. I make fewer mistakes and I like visualizing the process and knowing that every piece is correct. Since I don't have the pressure of needing to finish a quilt quickly, I've decided that next time I won't let myself feel rushed by those early finishers, but will try to take the time I need to make sure I'm being more accurate and really having fun with it. I did, however, appreciate the freedom from "over planning" a quilt. Every fabric doesn't have to be perfect, carefully selected and visualized, to have lovely results. And sharing the process with Betsy, and so many others, made it very special. All in all it was a great experience. I think it's too bad we have to wait an entire year to do it again, don't you?
I'll be machine quilting my finished top -- another first for me, as I've only machine quilted a few small things before. But I can't afford to pay someone to finish this, and Betsy has one of her own to do, so this will be an opportunity for me to learn something new. Feel free to come back to this blog for more looks at the final product. Just click on the Easy Street tab above.
Look at over 200 fascinating versions of this Mystery Quilt here : Easy Street's Final Link-Up
Wednesday, December 26, 2012
A Sophisticate on Easy Street - Part 5
'Twas the day after Christmas, and all through the house, I was happily cutting and stitching and chatting with friends and family on the phone. I woke to find the electricity had gone out in the night. What was light rain and falling temps when I drove home last night had turned to snow, so I pulled on my robe and stepped out to take some pictures of the first one of the season. I let the dog in and then sneaked back to bed while the house warmed up.
I'd cleared out part of the kitchen for Christmas Eve by piling things in my sewing room. First thing this morning I sorted and put that stuff away, instead of just moving the piles someplace else, which can be tempting when you have an entire house to yourself. Then I rewarded myself by cutting fabrics for week 5. Bonnie's purple is also my purple, but I have only one fabric, and I cut some 3 1/2" squares from that plum print to begin. Her blue is my green; I cut a pile of 2" squares with some scraps I had left over from an earlier week. Initial sewing and trimming showed me that my final pieces were just a few threads short of 3 1/2", so I cut the next set of plum fabric with the edge on the outside of my ruler line instead of hidden by the line. That worked perfectly, giving me the little extra width I needed. There's no real name for this shape, but it looks like a house to me. Given the time of year, I'm calling them "Up on the Rooftop" blocks. With only three greens it didn't seem worth trying to mix colors up within blocks so I stitched my Rooftop blocks with matching greens in the corners.
My quilt won't be the scrap-happy one Bonnie's is, but I'm fine with that. I love my fabrics and colors, and look forward to seeing it all come together. One of the best things about quilting is watching something emerge from fabric, threads, and ideas. You can plan all you want, but the finished project is always at least a little surprising. I like that!
An after-Christmas chat with DS on the phone got me to thinking about why I like quilting. A lot of the pleasure I get comes from remembering my Grandmothers' quilts. One of them enjoyed piecing simple patterns with a large variety of fabrics saved from sewing for her family. She pieced at home on her treadle machine or by hand, but quilted weekly with a group of women at church. The other Grandmother created applique quilts with realistic birds and flowers, reflecting her interests in art, garden design and bird-watching. She pieced and quilted them at home, controlling the results completely. Their quilts were different, like the women, but all of them are beautiful and special to their family.
Wasn't it the perfect day to be inside sewing and fortifying myself with hot tea and yummy Christmas leftovers?
This post is part of Bonnie Hunter's Week 5 Link-Up.
![]() |
| Snow on Magnolia and Holly in backyard. |
I'd cleared out part of the kitchen for Christmas Eve by piling things in my sewing room. First thing this morning I sorted and put that stuff away, instead of just moving the piles someplace else, which can be tempting when you have an entire house to yourself. Then I rewarded myself by cutting fabrics for week 5. Bonnie's purple is also my purple, but I have only one fabric, and I cut some 3 1/2" squares from that plum print to begin. Her blue is my green; I cut a pile of 2" squares with some scraps I had left over from an earlier week. Initial sewing and trimming showed me that my final pieces were just a few threads short of 3 1/2", so I cut the next set of plum fabric with the edge on the outside of my ruler line instead of hidden by the line. That worked perfectly, giving me the little extra width I needed. There's no real name for this shape, but it looks like a house to me. Given the time of year, I'm calling them "Up on the Rooftop" blocks. With only three greens it didn't seem worth trying to mix colors up within blocks so I stitched my Rooftop blocks with matching greens in the corners.
![]() |
| "Up on the Rooftop" blocks. |
My quilt won't be the scrap-happy one Bonnie's is, but I'm fine with that. I love my fabrics and colors, and look forward to seeing it all come together. One of the best things about quilting is watching something emerge from fabric, threads, and ideas. You can plan all you want, but the finished project is always at least a little surprising. I like that!
![]() |
| Playing with the pieces we've made so far. |
An after-Christmas chat with DS on the phone got me to thinking about why I like quilting. A lot of the pleasure I get comes from remembering my Grandmothers' quilts. One of them enjoyed piecing simple patterns with a large variety of fabrics saved from sewing for her family. She pieced at home on her treadle machine or by hand, but quilted weekly with a group of women at church. The other Grandmother created applique quilts with realistic birds and flowers, reflecting her interests in art, garden design and bird-watching. She pieced and quilted them at home, controlling the results completely. Their quilts were different, like the women, but all of them are beautiful and special to their family.
![]() |
| Front yard snow. |
Wasn't it the perfect day to be inside sewing and fortifying myself with hot tea and yummy Christmas leftovers?
This post is part of Bonnie Hunter's Week 5 Link-Up.
Friday, December 21, 2012
Cinnamon Roasted Pecans
I started making these nuts for Christmas several years ago. We host a kind of open house on Christmas Day for our extended family, and I like to have lots of different finger foods available. I don't remember where I found this recipe, but it is easy to make, foolproof, and addictive - what more could you want?! They are great for a party or for gift-giving. While pecans are expensive here, the rest of the ingredients are things that you'll likely have on hand, making it a pretty economical - and unique - gift. I start buying the nuts before Thanksgiving, a bag or two each time I get groceries, so its not insanely expensive all at once.
I've modified the original recipe, and also tripled it. If you don't want to make lots at once, feel free to cut the recipe by a third, but be aware that you may need to decrease the cooking time by 15 minutes or so.
Cinnamon Roasted Pecans
3 egg whites
1 T cold water
1 T vanilla
3 lbs pecan halves
1 1/2 c white sugar
1 1/2 c brown sugar
3/4 t salt
3 T cinnamon
1. Thoroughly grease two 9" x 13" glass pans. Preheat the oven to 250* F.
2. In a
3. In a separate bowl, combine sugars, salt and cinnamon. Mix well.
4. Add 1/2 of the sugar mixture to the pecans. Toss well to coat. Add remaining sugar mixture. Stir and toss well.
5. Divide the pecans between the two prepared pans. Spread them out so that they are evenly distributed in the pans.
6. Bake at 250* for 1 1/2 hours, stirring every 30 minutes. Pour nuts on to parchment paper lined cooling racks, and cool completely.
Thursday, December 20, 2012
Springtime on Easy Street - Part 3
Yes, I'm running behind at the moment. This happens every year... Despite my best intentions, I just don't manage to keep up with the steps. Finals were a priority, as I needed to get the best grades possible for admission to the RN program next year. Plus, I had an admission exam for said RN program... I'm so glad the studying is over for a few weeks!
The other thing that slows my sewing progress is the fact that I "lose" my sewing area every Christmas. You see, our living room is very long and narrow. If the furniture is along the walls, it feels like a bowling alley! We have the furniture arranged so that it's comfortable and welcoming, but that left an area about five feet deep behind everything. I claimed that as my sewing area! I have a table and desk back there, a power outlet, and a light - so it's just about perfect! During the holidays, though, we put the Christmas tree (a small live one in a pot) on my table. That means my sewing machine has to move somewhere else... Then I'm not as motivated, or I don't have a good place for it... It's okay, though - I know I'm not the only one a little behind! So here are some of my step 3 blocks, the shaded 4-patches.
I was really excited to get to use my pinks for this step. I just love the way they play off the purples, and my neutrals have a calming effect on the vibrant colors. I'm going to make sewing a priority tomorrow, and am planning on at least getting my steps 4 and 5 cut out, and a couple of each sewn up.
Did I mention I love my fabrics? :)
Monday, December 17, 2012
Knitting Projects
I learned to knit as a little girl, but didn't do much of it. Over the years I've tried a few times to make a sweater, but I don't think I ever finished one. I'd run into problems and not have anywhere to go for help. The world is very different now, with You-Tube and Ravelry, the ability to Google and use e-mail for help. So, drumroll please... Here's my first completed sweater, for my almost three-year-old Grandson, William.
I made it size four, so it may be way too big, but he's tall for his age, with broad shoulders. I'm eager to see a picture of it on him so I'll know if it comes close to fitting.
My son requested a hat for mountain climbing, and I'm about half-way done with that. But I figure his head isn't growing, so it can take a bit more time. I've also almost finished a pullover for me -- just one sleeve to go. Unfortunately our weather has warmed up again here, so I may have to turn on the AC to have a chance to wear it.
![]() |
| From "The Big Books of Kids' Knits" by Zoe Mellor |
I made it size four, so it may be way too big, but he's tall for his age, with broad shoulders. I'm eager to see a picture of it on him so I'll know if it comes close to fitting.
My son requested a hat for mountain climbing, and I'm about half-way done with that. But I figure his head isn't growing, so it can take a bit more time. I've also almost finished a pullover for me -- just one sleeve to go. Unfortunately our weather has warmed up again here, so I may have to turn on the AC to have a chance to wear it.
Subscribe to:
Posts (Atom)


