I went ahead and put a couple of the rows together tonight. I just couldn't figure out what it was going to look like! Even though I've seen pictures of lots of other people's completed Easy Street quilts, I've just been so curious to see how my color choices would "play" together, and how the on-point assembly would go together. I've never done a quilt on-point before, it's not nearly as difficult as I was afraid it would be. As long as I double check everything... I'm very happy with this so far! Hopefully tomorrow I will have time to finish putting it all together.
Yes, that's my husband laying there, playing his video games! His recovery is - finally - going well. The orange flannel quilt he's laying under is one I made him for his birthday.
Showing posts with label Easy Street. Show all posts
Saturday, August 17, 2013
Springtime on Easy Street - Part 8, Block A
Whoohooo!!! I finished all 16 blocks! They're not perfect - seams don't always match up, and points sometimes got cut off, but every component of this quilt is DONE! And once it's finished, it will be beautiful! I can't wait to get it all assembled!! (Too many exclamation points? Never!!)
First off, the central 9-patch blocks:
Next, with the left and right wings:
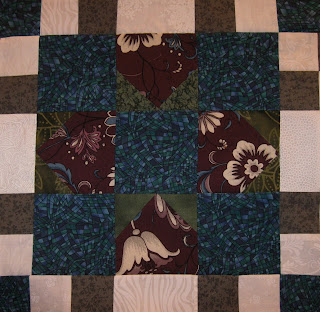
And last, but not least, top and bottom rows added to make the completed block:
On to assembly!
First off, the central 9-patch blocks:
Next, with the left and right wings:
And last, but not least, top and bottom rows added to make the completed block:
On to assembly!
Tuesday, August 13, 2013
Springtime on Easy Street - Part 8, Block B
I finally decided what I wanted to do with bordering this top (when it's finished...), so Saturday morning I double-checked the fabric I had remaining, and went to Hancock Fabrics. I'm going with a purple 1" finished inner border, and a 3" finished outer border and the binding in grey. I didn't have enough of a purple for the inner border, and was a little short of the grey as well. Once I got to the store, I discovered that they were having a sale - 50% off notions! Most of the cotton fabrics were marked down as well, so I ended up spending more than I had planned, but got more needles for my machine, more pins, lots of thread, a circle template, both border fabrics, and backing for the quilt. I found a steel grey fabric with white, cream, and lighter grey swirls running through it, a nice medium-sized print with plenty of movement that coordinates with the binding and won't show my quilting too obviously.
After I got home, I cut and sewed and pressed the border strips and the binding, so they'll be all ready to go when I finish the top. Then I started in on the block B units. I decided that, since I only needed to make 9 of them, I would get them finished first, and save the block A units for last (since there are 16 of those). I started with the center 9-patch:
Then I moved on and added the right and left "wings":
At that point, it was after midnight, so I went to bed. The next day, however, I was able to sit down for an hour or so and add the top and bottom rows, finishing out the B blocks:
I don't think I've ever made blocks this large! Mine usually finish at 9.5" or 12.5". I'm not entirely sure how to best square them up... I think I've gotten spoiled by my 12.5" square.
I'm really, really excited about the progress I've made this past week, and I'm really looking forward to finishing the piecing on this top. I've got the quilting pattern all picked out, and I'm ready to be snuggled up under this quit in the very near future!
Friday, August 9, 2013
Springtime on Easy Street - Part 7!
Today I worked on Part 7, and was so excited to get to begin putting all of the pieces together and see how my quilt would turn out. I've seen lots of completed tops made by other people, but I haven't come across one with my color choices, so I've had trouble visualizing exactly how it will look.
Before I could start working on the corner and setting triangles, though, I added the remaining bricks to the leftover cream/purple flying geese.
Then, it was on to the really fun stuff! First, the four corner triangles.
Then, the 12 setting triangles!
It feels like an awful lot of green right now, so I'm really looking forward to making the center blocks and assembling the top. I'm also considering my options for a border. First, do I want one? I think that I do. For one thing, it will make the quilting easier. For another, I'm not sure I want it to be so green around the edges... I'm thinking of a narrow inner border (maybe finished at 1"?) with a purple batik, and a larger (~3") outer border of the grey, if I have enough of it to do that, and still bind the quilt... At least I have plenty of time to decide. For now, though, I'm just excited that the end is in sight!
Before I could start working on the corner and setting triangles, though, I added the remaining bricks to the leftover cream/purple flying geese.
It feels like an awful lot of green right now, so I'm really looking forward to making the center blocks and assembling the top. I'm also considering my options for a border. First, do I want one? I think that I do. For one thing, it will make the quilting easier. For another, I'm not sure I want it to be so green around the edges... I'm thinking of a narrow inner border (maybe finished at 1"?) with a purple batik, and a larger (~3") outer border of the grey, if I have enough of it to do that, and still bind the quilt... At least I have plenty of time to decide. For now, though, I'm just excited that the end is in sight!
Springtime on Easy Street - Parts 4-6
I've finally begun working on my quilt again! My husband is recovering from surgery, and is pretty much confined to the bed or the recliner for several days. In order to keep him from going crazy, he's playing video games or sleeping through MythBusters on Netflix. So not only is the tv tied up, but he's crashed in my favorite chair! And with my favorite quilt... I decided that I needed a "me" project. I've made some great progress on gift projects and don't feel guilty about taking some time out to work on a UFO of my own.
So yesterday I pulled out the box with my Springtime on Easy Street quilt in it, and organized everything. I had put all of the steps - completed and in progress - into individual ziplock bags, but I hadn't labelled anything. After a half hour or so of counting units, reading back through the clues, labeling the bags, I realized that I had a lot more done than I remembered! And after a power-sewing marathon yesterday, I had completely finished steps 4 through 6!
For Part 4, I had finished about 1/3 of the pink and purple flying geese, and had already cut the green squares. I completed the geese and sewed them to the cream/purple geese and was done with this step.
Part 5 was even easier - all of my "Sitting Turkey" blocks were done!
I hadn't begun any of Part 6, so I made the green half square triangles...
...and assembled the brick blocks. I couldn't believe how much progress I made in just one day! I'm so glad that I pulled this out again.
Oh, and here's a look at my box with all of the parts in individual (labelled!) bags -
Saturday, January 12, 2013
A Sophisticate on Easy Street - Part 6
Here we are already -- the final steps completed, the finished quilt revealed. Was anyone else surprised at how complex-looking Easy Street is? I was expecting a much simpler arrangement of the pieces. Instead we get an intricate and fascinating design. I'm pleased; I hope everyone else it, too. I'm so glad Betsy kept pushing me to do this with her.
I'll admit I made some mistakes, especially mis-cutting fabrics, along the way, and they caused me to run short of some colors. Then when I saw the final layout I realized I'd want to control the arrangement of my blue fabrics, since I had so few of them, rather than try to make them appear random, so I've done a little tweaking of fabric layout. But those choices that a quilter makes as they go along are part of the fun, aren't they?
It's been too long since math in school; I don't remember how to calculate how many wrong ways there are to piece 25 squares into one block. But I assure you I almost found out the first time I tried to put Block A together! I had it all laid out next to my machine, carefully picked up and matched two squares, then stitched them one after another. Then I clipped them, put them back in their place, and began again, sewing the rows together. Should have been pretty fool proof, right? Well, I think the problem was I didn't have a firm picture in my head of how the block worked. I got the rows pieced without too much trouble, but then I tried to put the first row together. First I stitched the wrong ends of the row. After I took that long seam out, I joined the other seam, only to discover I'd turned one piece the wrong direction. All in all I sewed that seam four times before I had it right.
The rest of the seams weren't a lot better. It took me 2 and 1/2 hours to sew one block! That was enough for that day, I took a break and did some knitting. Struggling so much with one block left me feeling a little stupid, but turning the heel on a sock always seems like magic and I felt quite clever again. :)
After the first block fiasco I rethought my strategy. It seemed to me I'd do better joining the inner nine squares first, then attaching the strips on the sides, finishing with the top and bottom rows. It's easier for me to visualize and I made fewer mistakes, so I've been doing it that way since. I'm now down to about 30 minutes of sewing per block, if I'm really focused and accurate. Some of them still take up to 2 hours, though. I've also been laying out several of one block ahead of time on anything big and sturdy enough to hold them, so I don't have to stop sewing to figure out the layout each time I'm ready for a new square.
Once I had my squares up on the design wall in my sewing room I realized there were some mistakes, so I spent part of one evening taking out and resewing seams.
I may leave one of my incorrect blocks as is though, in honor of the tradition of deliberately including an error, to show you know you're not perfect, like God. To tell the truth I've never felt even close to perfect, and I'm pretty sure God's never worried that I'm approaching His record too closely, either. But I'll have to take out a lot of seams to fix that particular mistake, and I'm not sure it's worth it.
I love the way my fabrics are looking together. Spreading them out on the sofa so I can admire them keeps me motivated to sew more. My goal is to make one a day. Some days I get on a roll and make more, but as long as I do one I'll be finished in less than a month - which I think is pretty good for such a big, complicated, top. This is by far the most complex large quilt I've ever made. It's one thing to know intellectually that any design can be broken into small pieces and finished step by step. It's another thing to actually do it that way. I feel somehow empowered to take on more complex projects, thanks to Bonnie and this mystery quilt.
I've learned some things about myself while making Easy Street. I've learned that I don't really enjoy some of the faster quilting methods that others use. I don't like cutting out dozens of strips of one fabric, making perhaps hundreds of one shape and then another, efficient though it may be. I seem to have trouble staying focused and after a while I make sloppy, silly mistakes. What I do enjoy is cutting a few pieces, assembling them and then checking their accuracy before cutting and sewing more. I make fewer mistakes and I like visualizing the process and knowing that every piece is correct. Since I don't have the pressure of needing to finish a quilt quickly, I've decided that next time I won't let myself feel rushed by those early finishers, but will try to take the time I need to make sure I'm being more accurate and really having fun with it. I did, however, appreciate the freedom from "over planning" a quilt. Every fabric doesn't have to be perfect, carefully selected and visualized, to have lovely results. And sharing the process with Betsy, and so many others, made it very special. All in all it was a great experience. I think it's too bad we have to wait an entire year to do it again, don't you?
I'll be machine quilting my finished top -- another first for me, as I've only machine quilted a few small things before. But I can't afford to pay someone to finish this, and Betsy has one of her own to do, so this will be an opportunity for me to learn something new. Feel free to come back to this blog for more looks at the final product. Just click on the Easy Street tab above.
Look at over 200 fascinating versions of this Mystery Quilt here : Easy Street's Final Link-Up
I'll admit I made some mistakes, especially mis-cutting fabrics, along the way, and they caused me to run short of some colors. Then when I saw the final layout I realized I'd want to control the arrangement of my blue fabrics, since I had so few of them, rather than try to make them appear random, so I've done a little tweaking of fabric layout. But those choices that a quilter makes as they go along are part of the fun, aren't they?
![]() |
| I'm using one blue for all the Block B squares. |
It's been too long since math in school; I don't remember how to calculate how many wrong ways there are to piece 25 squares into one block. But I assure you I almost found out the first time I tried to put Block A together! I had it all laid out next to my machine, carefully picked up and matched two squares, then stitched them one after another. Then I clipped them, put them back in their place, and began again, sewing the rows together. Should have been pretty fool proof, right? Well, I think the problem was I didn't have a firm picture in my head of how the block worked. I got the rows pieced without too much trouble, but then I tried to put the first row together. First I stitched the wrong ends of the row. After I took that long seam out, I joined the other seam, only to discover I'd turned one piece the wrong direction. All in all I sewed that seam four times before I had it right.
![]() |
| My first block. |
After the first block fiasco I rethought my strategy. It seemed to me I'd do better joining the inner nine squares first, then attaching the strips on the sides, finishing with the top and bottom rows. It's easier for me to visualize and I made fewer mistakes, so I've been doing it that way since. I'm now down to about 30 minutes of sewing per block, if I'm really focused and accurate. Some of them still take up to 2 hours, though. I've also been laying out several of one block ahead of time on anything big and sturdy enough to hold them, so I don't have to stop sewing to figure out the layout each time I'm ready for a new square.
Once I had my squares up on the design wall in my sewing room I realized there were some mistakes, so I spent part of one evening taking out and resewing seams.
I may leave one of my incorrect blocks as is though, in honor of the tradition of deliberately including an error, to show you know you're not perfect, like God. To tell the truth I've never felt even close to perfect, and I'm pretty sure God's never worried that I'm approaching His record too closely, either. But I'll have to take out a lot of seams to fix that particular mistake, and I'm not sure it's worth it.
![]() |
| Proof that I'm not perfect. |
I love the way my fabrics are looking together. Spreading them out on the sofa so I can admire them keeps me motivated to sew more. My goal is to make one a day. Some days I get on a roll and make more, but as long as I do one I'll be finished in less than a month - which I think is pretty good for such a big, complicated, top. This is by far the most complex large quilt I've ever made. It's one thing to know intellectually that any design can be broken into small pieces and finished step by step. It's another thing to actually do it that way. I feel somehow empowered to take on more complex projects, thanks to Bonnie and this mystery quilt.
![]() |
| Easy Street on my Design wall as of Jan. 13. I can't seem to get the greens to show up in the photo, but they do in person. |
I've learned some things about myself while making Easy Street. I've learned that I don't really enjoy some of the faster quilting methods that others use. I don't like cutting out dozens of strips of one fabric, making perhaps hundreds of one shape and then another, efficient though it may be. I seem to have trouble staying focused and after a while I make sloppy, silly mistakes. What I do enjoy is cutting a few pieces, assembling them and then checking their accuracy before cutting and sewing more. I make fewer mistakes and I like visualizing the process and knowing that every piece is correct. Since I don't have the pressure of needing to finish a quilt quickly, I've decided that next time I won't let myself feel rushed by those early finishers, but will try to take the time I need to make sure I'm being more accurate and really having fun with it. I did, however, appreciate the freedom from "over planning" a quilt. Every fabric doesn't have to be perfect, carefully selected and visualized, to have lovely results. And sharing the process with Betsy, and so many others, made it very special. All in all it was a great experience. I think it's too bad we have to wait an entire year to do it again, don't you?
I'll be machine quilting my finished top -- another first for me, as I've only machine quilted a few small things before. But I can't afford to pay someone to finish this, and Betsy has one of her own to do, so this will be an opportunity for me to learn something new. Feel free to come back to this blog for more looks at the final product. Just click on the Easy Street tab above.
Look at over 200 fascinating versions of this Mystery Quilt here : Easy Street's Final Link-Up
Friday, December 7, 2012
Springtime on Easy Street - Part 2
I haven't been able to do much on this step - Flying Geese - this week. Between work, finals, and more work my time and energy have been pretty much gone. I did get everything cut out, though, and managed to piece a few units just to make sure I had cut things correctly. They're not perfect, but they're good enough. I work this weekend, then have two more finals on Tuesday. Wednesday is going to be my first absolutely free day in quite awhile, and I plan to spend it at my sewing machine!
I wish I could figure out how to take pictures that are true to color - my purples are much richer and more purple-y, and a lot less blue than they look here...
Monday, November 26, 2012
A Sophisticate on Easy Street - Part 1
A couple of phone calls with Betsy the morning the first step was released established that we needed to cut twenty Width-of-Fabric strips in our mutual gray. Then, since most of our background fabrics are in fat quarters, we could cut the longer gray strips in half and match them with the lighter fabrics to piece. Clear as mud, right? My background fabrics are all white on white, Betsy's are cream. Both look great with the gray. I had two white-on-white fabrics that were 1/2 yard cuts. So I used them full length and for half of the strips. One is the stripe you can clearly see in the above picture upper right, the other is a more mottled and seen center square, lower left end. The rest of my strips came from my assorted fat quarters.
I'm not the world's most accurate quilter, so I took my time and carefully cut my fabrics strips. After sewing them together I pressed the seams flat, as I've read that helps to set them. I then proceeded to cut the strips into 2" pieces. After cutting 200, I suddenly realized I'd forgotten to go back and press the seams to one side. So I spent almost an hour ironing those little pieces open, seams pressed toward the gray end. :(
Despite that setback, I finished all my squares on Sunday. The corners meet nicely in the center, and on the back they swirl very prettily. 400 four-patches now reside, labelled, in a large baggie, waiting for the next big reveal. In the meantime, I think I'll go knit some socks...
This post is linked to Easy Street Monday Link-Up #1!
Springtime On Easy Street - Part 1
Even though this week's Easy Street step was pretty simple - 4 patches - I actually learned a new technique! I've heard about spinning seams, but had never attempted it before. If I have a lot of bulk at intersecting seams, I usually just iron them open. On Friday, though, I decided that this would be as good a time as any to see if I could manage to figure how to get the seams to spin. To my surprise, it really wasn't that difficult, and it didn't take any more time than pressing all of the seams open would have. All of my centers match up beautifully, and the backs of my units look great, too!
The "spun seams":
My 200 4 patches:
Now I'm off to work on Christmas presents!
This post has been linked to the Easy Street Monday Link-Up #1!
The "spun seams":
My 200 4 patches:
Now I'm off to work on Christmas presents!
This post has been linked to the Easy Street Monday Link-Up #1!
A Sophisticate on Easy Street -- Fabric Selections
This is my first time making one of Bonnie Hunter's mystery quilts, so the entire process is a bit of a mystery to me. My daughter has been urging me to join her for several years, but I never felt organized enough, or de-stressed enough, to tackle it. Earlier this year she practically FORCED me to start sewing again, and it felt good. So I agreed to join the challenge, and here I am.
After brainstorming possible color combinations, we finally went fabric shopping. My only clear plan was to use fabrics from my stash. First we chose our fabric-in-common, a lovely gray that we both agreed we wouldn't normally pick. Then my stash busting plan took a left turn when I fell in love with a deep plum, teal and cream print. Dramatic and sophisticated, it required colors I couldn't be sure I had at home. So I bought fabric -- the all over inspiration print and a coordinating plum to start. The hunt began for suitable teals, which proved elusive. (Turns out I did have a few at home to mix in.)
Those of you making the quilt will realize that I needed a fourth color. Olive green seemed a good choice, and it was hard to find, too. I bought a large amount of one batik print, and added a couple of others from my stash. For the background we decided white-on-white prints were necessary to provide the proper pop of color.
In the end I had one gray for the constant, one plum, four teal and three olive fabrics. Not exactly the scrappy explosion I'd expected, but I'm quite happy with my colors and it will be fun to see how they interact as the quilt unfolds. Just to make things more confusing, I'm using my blues for Bonnie's greens and my greens for her blues -- got that? (I labelled them all and am counting on Betsy to keep me straight.)
Wednesday, November 21, 2012
Springtime on Easy Street - Fabric Selections
If you haven't already checked out Bonnie Hunter's new mystery quilt Easy Street, you really should! I was undecided about my color choices for quite awhile. While I love the purples and grey that Bonnie's using, I wasn't as convinced about the lime greens and aqua/turquoises, nor the black on white prints. For awhile, I planned on using a slight variation on her colors - apple greens and sky blues, with my neutrals to be determined later. But I really felt that it needed some rose, too. I debated switching out the purples for a deep rose, but purple is one of my favorite colors, and I've never used it in a quilt! It wasn't until the morning that Mom and I were going to the fabric stores (an hour away!) that I finally settled on colors, and a theme.
Between the greens, blues, and purples the fabrics felt like spring - something that will be rather elusive here for awhile. Everything is so brown and grey until mid-March or early April. The bright colors made me happy, but it still didn't feel quite right. I realized that my real hangup was the blue, and I still really wanted rose. It's not that I don't like blue, it just wasn't inspiring me for this project.
What I finally settled on was spring greens, rosy pinks, and dark purples - along with the grey fabric that Mom and I are both utilizing. I also chose cream-on-cream prints rather than black on white, as the creams felt calmer to me. My fabrics feel like a spring garden now, and they make me smile just to look at them!
I'm going to call my quilt "Springtime on Easy Street". It's a little obvious, I know, but it just fits. I don't have much of a fabric stash, so I did buy the majority of the fabric. I got quarter-yard cuts and made sure that I had a nice range of tones and shades within each color - Mom was a big help there! I did have a purple, a couple of pinks, and a few neutrals in my stash that I pulled in, too. I am so pleased with my fabric choices. I think that working with them this winter will be so much fun!
Tuesday, November 20, 2012
This Blog is Bonnie Hunter's Fault...
I have been an avid follower of Bonnie Hunter's Quiltville for several years now. Two years ago, I participated in her annual mystery quilt - that year it was Roll, Roll, Cotton Boll, and I loved it! The quilt is not finished yet (I was in nursing school at the time, and got bogged down with all of the monotonous string piecing!), but I love it, and it is definitely not going to stay a UFO for much longer. Last year, I did not make Orca Bay, as the stress of a new job was just too much for me. This year, however, I'm all in!
I was so excited when Bonnie announced this year's quilt - Easy Street! I enjoyed the challenge of Cotton Boll, but really don't have the time for something quite that intricate, so the fact that she says it's going to be simpler is perfect for me!!
Mom has started quilting again this year, after a long hiatus, so we have decided to tackle the mystery together - sort of! We each want our own quilt, and have different ideas for what we'd like, so we're making our own quilts, but we've added a twist. In Bonnie's fabric requirements, she suggest one "constant" fabric (everything else is scrappy). For our quilts, Mom and I have decided to use the same constant fabric, but pick our own colors/themes from there. After spending quite a bit of time in several fabric shops - and Olive Garden, but I digress - on one very fun day, we also decided to go with a gray. If my kitchen table wasn't covered up with groceries for Thanksgiving, I'd try to get a better photo, but this will have to do for now... lol!
This fabric will be the unifier between our quilts. I'm really excited about the mystery quilt, and having a common fabric between the two of our quilts is going to be so much fun! We ended up starting this blog so that we could post weekly updates of our progress on the mystery quilt, and also participate in Bonnie's weekly linky parties. So thanks, Bonnie, for giving Mom and me several new things to do together!
Oh, and the first clue is up this Friday! Can you tell I'm excited?!
Subscribe to:
Posts (Atom)


