Showing posts with label Quilts. Show all posts

Saturday, August 17, 2013

Springtime on Easy Street - A Sneak Peek!

I went ahead and put a couple of the rows together tonight.  I just couldn't figure out what it was going to look like!  Even though I've seen pictures of lots of other people's completed Easy Street quilts, I've just been so curious to see how my color choices would "play" together, and how the on-point assembly would go together.  I've never done a quilt on-point before, it's not nearly as difficult as I was afraid it would be.  As long as I double check everything...  I'm very happy with this so far!  Hopefully tomorrow I will have time to finish putting it all together.


Yes, that's my husband laying there, playing his video games!  His recovery is - finally - going well.  The orange flannel quilt he's laying under is one I made him for his birthday.

Springtime on Easy Street - Part 8, Block A

Whoohooo!!!  I finished all 16 blocks!  They're not perfect - seams don't always match up, and points sometimes got cut off, but every component of this quilt is DONE!  And once it's finished, it will be beautiful!  I can't wait to get it all assembled!!  (Too many exclamation points? Never!!)

First off, the central 9-patch blocks:

Next, with the left and right wings:

And last, but not least, top and bottom rows added to make the completed block:

On to assembly!


Tuesday, August 13, 2013

Springtime on Easy Street - Part 8, Block B

I finally decided what I wanted to do with bordering this top (when it's finished...), so Saturday morning I double-checked the fabric I had remaining, and went to Hancock Fabrics.  I'm going with a purple 1" finished inner border, and a 3" finished outer border and the binding in grey.  I didn't have enough of a purple for the inner border, and was a little short of the grey as well.  Once I got to the store, I discovered that they were having a sale - 50% off notions!  Most of the cotton fabrics were marked down as well, so I ended up spending more than I had planned, but got more needles for my machine, more pins, lots of thread, a circle template, both border fabrics, and backing for the quilt.  I found a steel grey fabric with white, cream, and lighter grey swirls running through it, a nice medium-sized print with plenty of movement that coordinates with the binding and won't show my quilting too obviously.


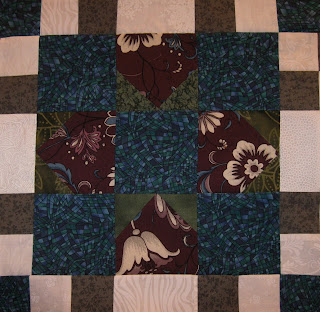
After I got home, I cut and sewed and pressed the border strips and the binding, so they'll be all ready to go when I finish the top.  Then I started in on the block B units.  I decided that, since I only needed to make 9 of them, I would get them finished first, and save the block A units for last (since there are 16 of those).  I started with the center 9-patch:

Then I moved on and added the right and left "wings":

At that point, it was after midnight, so I went to bed.  The next day, however, I was able to sit down for an hour or so and add the top and bottom rows, finishing out the B blocks:


I don't think I've ever made blocks this large!  Mine usually finish at 9.5" or 12.5".  I'm not entirely sure how to best square them up...  I think I've gotten spoiled by my 12.5" square.


 I'm really, really excited about the progress I've made this past week, and I'm really looking forward to finishing the piecing on this top.  I've got the quilting pattern all picked out, and I'm ready to be snuggled up under this quit in the very near future!

Friday, August 9, 2013

Springtime on Easy Street - Part 7!

Today I worked on Part 7, and was so excited to get to begin putting all of the pieces together and see how my quilt would turn out.  I've seen lots of completed tops made by other people, but I haven't come across one with my color choices, so I've had trouble visualizing exactly how it will look.

Before I could start working on the corner and setting triangles, though, I added the remaining bricks to the leftover cream/purple flying geese.

 Then, it was on to the really fun stuff!  First, the four corner triangles.


Then, the 12 setting triangles!
It feels like an awful lot of green right now, so I'm really looking forward to making the center blocks and assembling the top.  I'm also considering my options for a border.  First, do I want one?  I think that I do.  For one thing, it will make the quilting easier.  For another, I'm not sure I want it to be so green around the edges...  I'm thinking of a narrow inner border (maybe finished at 1"?) with a purple batik, and a larger (~3") outer border of the grey, if I have enough of it to do that, and still bind the quilt...  At least I have plenty of time to decide.  For now, though, I'm just excited that the end is in sight!

Springtime on Easy Street - Parts 4-6

I've finally begun working on my quilt again!  My husband is recovering from surgery, and is pretty much confined to the bed or the recliner for several days.  In order to keep him from going crazy, he's playing video games or sleeping through MythBusters on Netflix.  So not only is the tv tied up, but he's crashed in my favorite chair!  And with my favorite quilt...  I decided that I needed a "me" project.  I've made some great progress on gift projects and don't feel guilty about taking some time out to work on a UFO of my own.

So yesterday I pulled out the box with my Springtime on Easy Street quilt in it, and organized everything.  I had put all of the steps - completed and in progress - into individual ziplock bags, but I hadn't labelled anything.  After a half hour or so of counting units, reading back through the clues, labeling the bags, I realized that I had a lot more done than I remembered!  And after a power-sewing marathon yesterday, I had completely finished steps 4 through 6!
For Part 4, I had finished about 1/3 of the pink and purple flying geese, and had already cut the green squares.  I completed the geese and sewed them to the cream/purple geese and was done with this step.

Part 5 was even easier - all of my "Sitting Turkey" blocks were done!
I hadn't begun any of Part 6, so I made the green half square triangles...
...and assembled the brick blocks. I couldn't believe how much progress I made in just one day!  I'm so glad that I pulled this out again.

Oh, and here's a look at my box with all of the parts in individual (labelled!) bags -


Saturday, January 12, 2013

A Sophisticate on Easy Street - Part 6

Here we are already -- the final steps completed, the finished quilt revealed. Was anyone else surprised at how complex-looking Easy Street is? I was expecting a much simpler arrangement of the pieces. Instead we get an intricate and fascinating design. I'm pleased; I hope everyone else it, too. I'm so glad Betsy kept pushing me to do this with her.

I'll admit I made some mistakes, especially mis-cutting fabrics, along the way, and they caused me to run short of some colors. Then when I saw the final layout I realized I'd want to control the arrangement of my blue fabrics, since I had so few of them, rather than try to make them appear random, so I've done a little tweaking of fabric layout. But those choices that a quilter makes as they go along are part of the fun, aren't they?

I'm using one blue for all the Block B squares.

It's been too long since math in school; I don't remember how to calculate how many wrong ways there are to piece 25 squares into one block. But I assure you I almost found out the first time I tried to put Block A together! I had it all laid out next to my machine, carefully picked up and matched two squares, then stitched them one after another. Then I clipped them, put them back in their place, and began again, sewing the rows together. Should have been pretty fool proof, right? Well, I think the problem was I didn't have a firm picture in my head of how the block worked. I got the rows pieced without too much trouble, but then I tried to put the first row together. First I stitched the wrong ends of the row. After I took that long seam out, I joined the other seam, only to discover I'd turned one piece the wrong direction. All in all I sewed that seam four times before I had it right.

My first block.
The rest of the seams weren't a lot better. It took me 2 and 1/2 hours to sew one block! That was enough for that day, I took a break and did some knitting. Struggling so much with one block left me feeling a little stupid, but turning the heel on a sock always seems like magic and I felt quite clever again. :)


After the first block fiasco I rethought my strategy. It seemed to me I'd do better joining the inner nine squares first, then attaching the strips on the sides, finishing with the top and bottom rows. It's easier for me to visualize and I made fewer mistakes, so I've been doing it that way since. I'm now down to about 30 minutes of sewing per block, if I'm really focused and accurate. Some of them still take up to 2 hours, though. I've also been laying out several of one block ahead of time on anything big and sturdy enough to hold them, so I don't have to stop sewing to figure out the layout each time I'm ready for a new square.

Once I had my squares up on the design wall in my sewing room I realized there were some mistakes, so I spent part of one evening taking out and resewing seams.

 I may leave one of my incorrect blocks as is though, in honor of the tradition of deliberately including an error, to show you know you're not perfect, like God. To tell the truth I've never felt even close to perfect, and I'm pretty sure God's never worried that I'm approaching His record too closely, either. But I'll have to take out a lot of seams to fix that particular mistake, and I'm not sure it's worth it.
Proof that I'm not perfect.

I love the way my fabrics are looking together. Spreading them out on the sofa so I can admire them keeps me motivated to sew more. My goal is to make one a day. Some days I get on a roll and make more, but as long as I do one I'll be finished in less than a month - which I think is pretty good for such a big, complicated, top. This is by far the most complex large quilt I've ever made. It's one thing to know intellectually that any design can be broken into small pieces and finished step by step. It's another thing to actually do it that way. I feel somehow empowered to take on more complex projects, thanks to Bonnie and this mystery quilt.

Easy Street on my Design wall as of Jan. 13.
I can't seem to get the greens to show up in the photo, but they do in person.

I've learned some things about myself while making Easy Street. I've learned that I don't really enjoy some of the faster quilting methods that others use. I don't like cutting out dozens of strips of one fabric, making perhaps hundreds of one shape and then another, efficient though it may be. I seem to have trouble staying focused and after a while I make sloppy, silly mistakes. What I do enjoy is cutting a few pieces, assembling them and then checking their accuracy before cutting and sewing more. I make fewer mistakes and I like visualizing the process and knowing that every piece is correct.  Since I don't have the pressure of needing to finish a quilt quickly, I've decided that next time I won't let myself feel rushed by those early finishers, but will try to take the time I need to make sure I'm being more accurate and really having fun with it. I did, however, appreciate the freedom from "over planning" a quilt. Every fabric doesn't have to be perfect, carefully selected and visualized, to have lovely results. And sharing the process with Betsy, and so many others, made it very special. All in all it was a great experience.  I think it's too bad we have to wait an entire year to do it again, don't you?

I'll be machine quilting my finished top -- another first for me, as I've only machine quilted a few small things before. But I can't afford to pay someone to finish this, and Betsy has one of her own to do, so this will be an opportunity for me to learn something new. Feel free to come back to this blog for more looks at the final product. Just click on the Easy Street tab above.

Look at over 200 fascinating versions of this Mystery Quilt here : Easy Street's Final Link-Up

Friday, December 7, 2012

Springtime on Easy Street - Part 2


I haven't been able to do much on this step - Flying Geese - this week.  Between work, finals, and more work my time and energy have been pretty much gone.  I did get everything cut out, though, and managed to piece a few units just to make sure I had cut things correctly.  They're not perfect, but they're good enough.  I work this weekend, then have two more finals on Tuesday.  Wednesday is going to be my first absolutely free day in quite awhile, and I plan to spend it at my sewing machine!

I wish I could figure out how to take pictures that are true to color - my purples are much richer and more purple-y, and a lot less blue than they look here...

Monday, December 3, 2012

A Sophisticate on Easy Street - Part 2

I'd mentioned to Betsy that I was looking forward to working with some color this week, so I could see how my fabrics would look cut apart and sewn with the others. It turns out this week's color is... Purple! My color choices are quite different from Bonnie's, but her purple is my plum, so that makes this step extra clear. I only have one fabric for this color, which I think officially makes it a "Controlled Scrap" quilt. I would have been happy to use more fabrics, but between our two fabric stores and my stash I couldn't come up with another piece that matched enough for me, so it's all plum, all the way. That's OK, I really like this one, which is a companion piece from the same line as my inspiration fabric. (I didn't necessarily plan on having an inspiration fabric. I just saw it, fell in love, and said, "I want a quilt that looks like that." Voile, an inspiration fabric is born!)

Inspiration Fabric on Left, Fabric Used in Quilt on Right
If my calculations are correct I need 11-13 plum WOF strips 2" wide, depending on the actual WOF. (Ended up needing 10.) And I need just a tad over 26 24" strips of background, since most of these pieces are fat quarters. Will check with Betsy to see if her math agrees with mine. Since I don't have a cutting surface tall enough to cut fabric really comfortably I'll be splitting that step up. Otherwise, back trouble will plague me all day.

Got the strips cut with no problem. I appreciated Bonnie's heads-up for next week so we could at least cut the background strips while we had the fabrics out. It saved time, and I find there's often a bit of waste every time I have to pull a fabric out and prepare to cut from it again. I'm a bit nervous because I'm almost out of my white-on-whites now. If we need them again I may have to go shopping for a few more. (That would be a tragedy, wouldn't it? LOL) I haven't used these rulers before, but her video tutorial was clear and straightforward so I don't anticipate problems. I may have them, but at least I don't anticipate them.

After cutting out the plum triangles I realized my first mistake -- I'd made one and a half as many of those strips as I needed, and twice as many background strips, because I forgot to allow for the overlap you get when you use the triangle rulers to cut your shapes. It's a basic visualization mistake that I'm no too happy about. I'm afraid all those background strips will be wasted, and I'll definitely need more white-on-white fabric. Can't help wishing the directions came with an estimate of how much length you need to cut of the strips -- but it's my fault for not thinking clearly. At any rate, an hour with Jessica Fletcher and "Murder She Wrote" got almost all the triangles cut out.

A call from Betsy warned me to keep track of the smaller triangles so that a pair that is cut together is stitched into the same unit. Seems that makes the sewing more precise. I'll do my best to keep the sets organized and in order as I chain stitch them. I've never had great success getting flying geese sections into a quilt with all their points exactly right. I'm being as careful as I can, but I'm also trying to embrace the idea that quilts don't have to be perfect to be worth making. And I do like the way the plum fabric looks with the white-on-white background.


This post is part of Bonnie Hunter's Week Two linky: http://quiltville.blogspot.com/2012/12/mystery-monday-link-up-part-2.html.

Friday, November 30, 2012

Sewing Room - Mom

My Sewing Room is a work in progress. Formerly the Master Bed Room, it's located just off the Living Room downstairs. After DH died I moved to one of the upstairs bedrooms, and I'm very happy there. So I recently decided to make better use of the MBR by turning it into a sewing room. I kept the soft sage green paint on the walls. The flooring is laminate tiles, ideal for sweeping up stray threads or finding dropped pins. We had added cabinets along one wall years ago, and they're perfect for storing quilting and sewing stuff.


The blocks hanging on the cabinet doors are part of an on-going series of sampler squares, where I try out new techniques or different features on my machine. Some day they may be a quilt. Right now I just love looking at them. Behind the doors on the left are my large pieces of fabric, some quilt books, and odds and ends that don't fit elsewhere. The drawers hold fabrics for particular quilts I haven't started yet, notions, hand sewing and embroidery needs, etc. The painting was done by my Grandmother, Vera Grutter, and is me as a child. The antique clock on the shelf was also hers, and the quilts piled below it were made by her and my other Grandmother, Louise Quiggle. So they are always with me when I sew, and that makes me very happy. The jars hold small scraps sorted by color. I love just looking at them and thinking about how I could use the colors. The storage on the right is ready to be rearranged to accommodate the yarns I've recently acquired for knitting and weaving.

Swinging left from the above picture you would see a tall, narrow window that isn't in the photo, and the new daybed. The door in the photo goes to the back deck, and the area in front of it is kind of my dumping ground for things I need to keep handy but haven't found a good place for yet.

The plastic bins store most of my fabric stash, lots of fat quarters. I cut on top of them. It's really too low, so I don't cut for long at one time, but I haven't decided how to arrange this part of the room better. I do like being able to move around three sides of my cutting table.

The daybed is new. One of my goals is to make a quilt and pillows for it this spring. Right now one end holds fabric and pieces for Bonnie Hunter's mystery quilt, while Christmas presents are collecting on the other. I plan on mounting rods on the walls for quilts and weavings in the near future.

Opposite the daybed I have my design area -- wall-mounted flannel that I can stick fabrics and squares to. Hanging there now is my "Little House on the Prairie" Triangle quilt. It's waiting to for me to make the back, then sandwich, tie and finish it with prairie points. Or do I put the prairie points on next? I'm not sure, I'll have to think about this...

I made the chair cover out of fabric from my stash. I love the sky blue color with the green walls, it makes me feel like I'm sewing in my garden! Betsy made the sewing machine cover some years ago. When she loaned me her machine, it came along for the ride. I love having three generations of family in my room. The sewing machine table backs up to the ironing board, so as I sew I look toward my pretty shelves, Grandmothers' quilts and jars of fabric scraps.

Some people have their spaces arranged so they never have to leave their chairs. It works very well for them, but I really like being forced to walk around the room as my sewing progresses. It keeps me from getting too stiff. I also find good lighting is more important as I get older, and I have a floor lamp with a goose neck attachment behind my sewing chair.

So that's my Sewing Room so far. It's lovely to have the space, and I plan to continue to enjoy it. But I'll be honest -- if I could chose I'd rather have the house full of people and be sewing on the tiny folding table I used for years. Still, we don't always get to chose the path our lives take, we can only do the best with what we have, and my sewing room is one way I'm trying to do that.

Tuesday, November 20, 2012

This Blog is Bonnie Hunter's Fault...

I have been an avid follower of Bonnie Hunter's Quiltville for several years now.  Two years ago, I participated in her annual mystery quilt - that year it was Roll, Roll, Cotton Boll, and I loved it!  The quilt is not finished yet (I was in nursing school at the time, and got bogged down with all of the monotonous string piecing!), but I love it, and it is definitely not going to stay a UFO for much longer.  Last year, I did not make Orca Bay, as the stress of a new job was just too much for me.  This year, however, I'm all in!

I was so excited when Bonnie announced this year's quilt - Easy Street!  I enjoyed the challenge of Cotton Boll, but really don't have the time for something quite that intricate, so the fact that she says it's going to be simpler is perfect for me!!

Mom has started quilting again this year, after a long hiatus, so we have decided to tackle the mystery together - sort of!  We each want our own quilt, and have different ideas for what we'd like, so we're making our own quilts, but we've added a twist.  In Bonnie's fabric requirements, she suggest one "constant" fabric (everything else is scrappy).  For our quilts, Mom and I have decided to use the same constant fabric, but pick our own colors/themes from there.  After spending quite a bit of time in several fabric shops - and Olive Garden, but I digress - on one very fun day, we also decided to go with a gray.  If my kitchen table wasn't covered up with groceries for Thanksgiving, I'd try to get a better photo, but this will have to do for now... lol!


This fabric will be the unifier between our quilts.  I'm really excited about the mystery quilt, and having a common fabric between the two of our quilts is going to be so much fun!  We ended up starting this blog so that we could post weekly updates of our progress on the mystery quilt, and also participate in Bonnie's weekly linky parties.  So thanks, Bonnie, for giving Mom and me several new things to do together! 

Oh, and the first clue is up this Friday!  Can you tell I'm excited?!