Here we are already -- the final steps completed, the finished quilt revealed. Was anyone else surprised at how complex-looking Easy Street is? I was expecting a much simpler arrangement of the pieces. Instead we get an intricate and fascinating design. I'm pleased; I hope everyone else it, too. I'm so glad Betsy kept pushing me to do this with her.
I'll admit I made some mistakes, especially mis-cutting fabrics, along the way, and they caused me to run short of some colors. Then when I saw the final layout I realized I'd want to control the arrangement of my blue fabrics, since I had so few of them, rather than try to make them appear random, so I've done a little tweaking of fabric layout. But those choices that a quilter makes as they go along are part of the fun, aren't they?
 |
| I'm using one blue for all the Block B squares. |
It's been too long since math in school; I don't remember how to calculate how many wrong ways there are to piece 25 squares into one block. But I assure you I almost found out the first time I tried to put Block A together! I had it all laid out next to my machine, carefully picked up and matched two squares, then stitched them one after another. Then I clipped them, put them back in their place, and began again, sewing the rows together. Should have been pretty fool proof, right? Well, I think the problem was I didn't have a firm picture in my head of how the block worked. I got the rows pieced without too much trouble, but then I tried to put the first row together. First I stitched the wrong ends of the row. After I took that long seam out, I joined the other seam, only to discover I'd turned one piece the wrong direction. All in all I sewed that seam four times before I had it right.
 |
| My first block. |
The rest of the seams weren't a lot better. It took me 2 and 1/2 hours to sew one block! That was enough for that day, I took a break and did some knitting. Struggling so much with one block left me feeling a little stupid, but turning the heel on a sock always seems like magic and I felt quite clever again. :)
After the first block fiasco I rethought my strategy. It seemed to me I'd do better joining the inner nine squares first, then attaching the strips on the sides, finishing with the top and bottom rows. It's easier for me to visualize and I made fewer mistakes, so I've been doing it that way since. I'm now down to about 30 minutes of sewing per block, if I'm really focused and accurate. Some of them still take up to 2 hours, though. I've also been laying out several of one block ahead of time on anything big and sturdy enough to hold them, so I don't have to stop sewing to figure out the layout each time I'm ready for a new square.
Once I had my squares up on the design wall in my sewing room I realized there were some mistakes, so I spent part of one evening taking out and resewing seams.
I may leave one of my incorrect blocks as is though, in honor of the tradition of deliberately including an error, to show you know you're not perfect, like God. To tell the truth I've never felt even close to perfect, and I'm pretty sure God's never worried that I'm approaching His record too closely, either. But I'll have to take out a lot of seams to fix that particular mistake, and I'm not sure it's worth it.
 |
| Proof that I'm not perfect. |
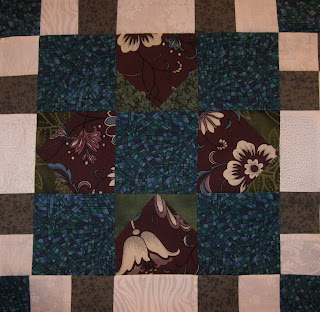
I love the way my fabrics are looking together. Spreading them out on the sofa so I can admire them keeps me motivated to sew more. My goal is to make one a day. Some days I get on a roll and make more, but as long as I do one I'll be finished in less than a month - which I think is pretty good for such a big, complicated, top. This is by far the most complex large quilt I've ever made. It's one thing to know intellectually that any design can be broken into small pieces and finished step by step. It's another thing to actually do it that way. I feel somehow empowered to take on more complex projects, thanks to Bonnie and this mystery quilt.
 |
Easy Street on my Design wall as of Jan. 13.
I can't seem to get the greens to show up in the photo, but they do in person. |
I've learned some things about myself while making Easy Street. I've learned that I don't really enjoy some of the faster quilting methods that others use. I don't like cutting out dozens of strips of one fabric, making perhaps hundreds of one shape and then another, efficient though it may be. I seem to have trouble staying focused and after a while I make sloppy, silly mistakes. What I do enjoy is cutting a few pieces, assembling them and then checking their accuracy before cutting and sewing more. I make fewer mistakes and I like visualizing the process and knowing that every piece is correct. Since I don't have the pressure of needing to finish a quilt quickly, I've decided that next time I won't let myself feel rushed by those early finishers, but will try to take the time I need to make sure I'm being more accurate and really having fun with it. I did, however, appreciate the freedom from "over planning" a quilt. Every fabric doesn't have to be perfect, carefully selected and visualized, to have lovely results. And sharing the process with Betsy, and so many others, made it very special. All in all it was a great experience. I think it's too bad we have to wait an entire year to do it again, don't you?
I'll be machine quilting my finished top -- another first for me, as I've only machine quilted a few small things before. But I can't afford to pay someone to finish this, and Betsy has one of her own to do, so this will be an opportunity for me to learn something new. Feel free to come back to this blog for more looks at the final product. Just click on the Easy Street tab above.
Look at over 200 fascinating versions of this Mystery Quilt here :
Easy Street's Final Link-Up


